The ending King, Bishop and Knight versus lone King was probably one of my first endgame obsessions. I lived in a small dorm room in the middle of Chicago and owned (still own) one of the early-to-mid generation of chess computers: Radio Shack Chess Champion 2150. I think I paid $130 for it. Contrary to my hope of training with an in-house strong expert, eventual testing showed it to be closer to 1750 rating. Still, it was fun to set up openings and try to outplay the computer. I used to watch what it was thinking because computer chess was so new and I was curious how this machine "thought".
But one day, I found out that bishop and knight versus lone king was not a draw, just a difficult win under the constraints of the 50-move draw. So I started setting up positions on my trusty computerized punching bag and trying to win. I have known generally what to do and had even developed my own final phase beginning with this position:
My winning method involved moving the Bishop to the f1-h3 diagonal and shifting the Knight from e4 to f3, all the while taking care not to stalemate the Black King. The moves are 1.Ke1 Kg1 2.Bh3 Kh2 3.Bf1 Kg1 4.Nd2 Kh2 5.Kf2 Kh1 6.Bg2+ Kh2 7.Nf3#.
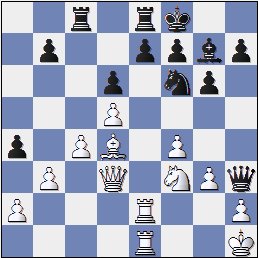
Last Sunday, I decided to try some internet chess and reached this position after my 55th move as Black in which I captured White's last pawn Kxe5:
So I had a chance to test myself. Over the years, I would not say that I ever learned this ending cold. And my successful but imperfect technique here pushed me to try to learn more of those subtleties that continue to elude me about this ending. With the help of the Shredder Tablebase website, I went over my game score with a fine-toothed comb and tried to figure out where I wasted moves and what the proper technique should have been.
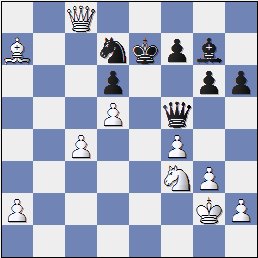
I want to push the White King to the edge of the board by centralizing all my pieces. White wants to stay away from the light-squared corners because that's where he can be checkmated. Once I get the White King to the corner, I need to organize my pieces a certain way and maneuver to force the White King to the deadly corner.
56.Kd3! I have to execute the mate before my 105th move. Shredder says Mate in 25 which I will hereafter abbreviate like M25. Optimal would be to checkmate on move 80. 56...Nf4+ WASTE+1. 56...Nc5+ was better by one move, but I don't think I can really fault myself for some of these small differences. 57.Kc3! Kd5 58.Kd2 Kd4! 59.Kc2! Ne2?!
This time Shredder tells me I have wasted 2 moves: WASTE+2. Better was 59.Nd3! with the Knight and Bishop eventually taking away c2 and e2.
60. Kb2?! WASTE-1 (White helps Black closer to mate by one tempo). 60.Kd2 resists one move longer.
60...Kc4?! WASTE+1. 60...Kd3 was better by one move.
Notice that the Bishop is on one of the long diagonals pointing into the non-mating corner and dividing the board into two triangular regions. If the White King gets chased by the Black King to the smaller red triangle, then he's that much closer to getting pushed to the mating corner.
61.Kc2! Nd4+ 62.Kb2! Bg6 63.Ka2! Kc3 (This is where the Black King likes to be.) 64.Ka3?! WASTE-5
White does well to choose the corner with 64.Ka1! instead of the game allowing 64...Bf7 65.Ka4 Bb3+! 66.Ka5 (66.Ka3 Nb5#) Kc4 67.Kb6 looks like he's breaking free of the walls, but 67...Ba4 sets up a new wall from a4-e8 that with the Black King's help can contain the White King in the small triangle a5-a8-d8.
But here my stereotyped thinking hurt me a little. I knew of the idea of attacking the corner square with the knight to dig the King out of the spider hole. And then the follow-up is to attack the next square with the bishop. But the knight isn't in place yet, so I confused myself here. More properly following my slightly suboptimal strategy would have been to play 64...Nb3 and if 64.Ka2 Bf5 (biding time) 65.Ka3 and only then 65...Bb1 66.Ka4.
Unfortunately, my confusion lasts for the next seven moves during which time my opponent offered a draw, but I soldiered on until move 72 began to look familiar again. 64...Bb1?! WASTE+2 65.Ka4 Kc4?! WASTE+2 66.Ka3! Kc3! 67.Ka4 Bc2+?! WASTE+2 68.Ka3! Nb3?! WASTE+3 69.Ka2! Nc5?! WASTE+2 70.Ka1 Nd3?! WASTE+2 71.Ka2 Nb4+ 72.Ka1! Bb3! 73.Kb1 M20. After 17 moves, I've only moved five moves closer to mate. But I'm familiar enough with this position to make steady progress from here.
Here begins the maneuver to dig White's King out of the non-mating corner.
73...Nc2! If the Knight arrived here by checking the King on a1, the Bishop can waste time by simply moving along the a2-g8 diagonal.
74.Kc1 Ba2! 75.Kd1 Nd4!
Notice that by centralizing, the knight grabs more squares, particularly the e2 square where it currently stops the White King from taking a shortcut toward the safe h8 corner. e2 is also where the knight may drop in to help herd the White King toward its doom at h1. The Black Knight will make a W pattern from where it began on b4-c2-d4-e2-f4.
76.Kc1 WASTE-3. From the above diagram, White has one of his best chances to break for freedom. Black must know the technique of stopping the fugitive with some well-timed moves. This maneuver is one of the prettiest in the mate and helps illustrate the cooperation of Bishop and Knight. 76.Ke1 Kd3 77.Kf2 starts to see daylight above the first rank. 77...Ne2!
A friend of mine called this the lock position. The Black King guards the green squares at e2, e3, and e4 while the Black Knight guards the seemingly porous red squares at g3 and f4. The White King needs to find a path to h8 via f3-g4 or g2-h3-h4. Luckily for Black, Be6 cuts off all these routes, keeping the fugitive near the deadly h1 square.
Back to the game after 76.Kc1
76...Ne2+ 77.Kd1 Kd3 78.Ke1 Bb3?! WASTE+2.
Here I mixed up the more crucial prophylaxis of 78...Ke3! with the timewasting 78...Bb3. If the White King goes back to d1, the Bishop can check him out of there.
79.Kf2 Bd5! Helping cover f3 ad g2 while the Knight covers g3 and f4. The White King either has to go g1-h2-h3 or back toward e1-d1.
80.Ke1 Ke3! 81.Kd1 Bb3+ 82.Ke1
Black's final tasks involve getting the Bishop to the d1-h5 diagonal and squeezing White down to two squares at h1 and h2. Unfortunately, many of my misconceptions still lead to inefficient moves.
82...Nf4! 83.Kf1 Bd1 84.Ke1 Bg4 85.Kf1
Here I went awry again by trying to post my pieces according to my formation at the top of this post. The game finished with
85...Nd5?! WASTE+6 86.Ke1?! WASTE-4 Nc3 WASTE+4 87.Kf1 Kd2 88.Kf2?! WASTE-1 Ne4+! 89.Kg2 Ke2 (my formation) 90.Kh2?! WASTE-2 Kf2 91.Kh1 Bh3?! WASTE+1 92.Kh2 Bf1?! WASTE+1 93.Kh1 Nd2 94.Kh2 Nf3+ 95.Kh1 Bg2# I mated with ten moves to spare and a net wastage of fifteen moves. But my opponent chose continuations totaling about 16 moves where he helped me toward mate. Without those, I might have overstepped the 50-move draw.
The most efficient path I know now from the above diagram is:
85...Be2+! It's okay and actually desirable to check the king here. The Knight hiding at the Black King's shoulder is in the right spot to deliver checkmate if the White King chooses 86.Ke1 Nd3#. 86.Kg1 Kf3 The King takes a drunken path to g3. 87.Kh2 Kf2 88.Kh1 Kg3 89.Kg1 Nh3+ 90.Kh1 Bf3#
Although the bishop check is a little harder to remember, the aesthetics of this final position and the fact that it is fastest persuades me to memorize this final method as the way to go.